
You’ve built a mobile app! Congratulations! You successfully leveraged the advantages and capabilities of the mobile platform AND navigated the pitfalls and trade-offs. Now your app is working and you couldn’t be happier…until you stare into the dimly lit tunnel of app deployment options. For the uninitiated, the list of prerequisites to app store approval can feel quite daunting, but keep reading and we will tell you how to deploy an iOS device without The App Store, bypassing that list entirely.
Don’t Panic
Privacy policy? EULA? 3rd Gen iPad screenshots? 2nd Gen iPad screenshots? Support URL?
Don’t panic! There are resources available on the web to help guide you through that long TO DO list. Such guides include:
- https://developer.apple.com/support/app-store/
- https://developer.apple.com/app-store/guidelines/
- https://developer.apple.com/app-store/submitting/
The Most Ideal Application
What is largely missing from existing guides is the information we outline below for how to bypass that long prerequisite list entirely and deploy an iOS device without the app store.
Caveat: The steps below are only applicable if you fall into a narrow band of R&D oriented developers. This method of app distribution is not appropriate for people seeking general public release or sale of their app.
Here are two scenarios for which this method is an ideal fit:
- Scenario One: Your targeted iOS devices are all company-issued to your team, and you already have the UDID of each device.
- Scenario Two: All your targeted iOS devices are sitting in the same R&D lab, and you just need an easy way for a lab technician to download your app onto every device in the lab.
Use Case
The following streamlined distribution method is tailored to the following use case:
- The set of all users and/or testers is known in advance.
- Those users can provide you the UDID from their devices.
- You wish to provide your users a download link that won’t require them to use TestFlight.
- And avoid the time limits that TestFlight applies.
- You do not wish to jailbreak your devices, nor use any non-Apple-authorized distribution channel.
How To Deploy an iOS Device Without The App Store
Version Requirements
All steps in this post have been demonstrated to work with:
- Xcode version(s): 11.5
- MacOS version(s): 10.15.5
- iOS version(s): 13.3
- Safari version(s): (at least) as of iOS 13, this is tied directly to iOS version
End-User Instructions (for the iPhone or iPad User)
Note: the following steps are applicable for both the first-time installation of your app and for subsequent updates.
To be provided to the user:
- A URL that starts with the prefix itms-services:// and ends with the location of your manifest.plist
(The bottom section of this blog post explains how a developer will create the manifest.plist and the URL.)
Give your user(s) the itms-services:// URL and the following instructions:
- Use iOS Settings to connect your device to the Internet.
- Launch Safari on the iPad/iPhone. You must use Safari; no other browser will do!
- Use the itms-services:// Safari Link provided by your development team. Navigate/browse to that link in Safari. MAKE SURE YOU FEED THE ENTIRE LINK to Safari. Trying to copy the link from certain sources (e.g. email or chat) can produce the nasty side-effect of only copying from the http onward, and missing the necessary itms-services:// prefix.
- Look for a prompt that says: “Open this page in iTunes?”
- Accept the prompt.
- Look for a second prompt that says something like “dropboxusercontent would like to install NameOfYourApp“.
- Accept this second prompt.
- Be advised: nothing further will happen. There is no confirmation message.
The iPhone or iPad’s UDID must necessarily have been incorporated into the Provisioning Profile when the developer built the distributable edition of the app. If your device was not known to the developer, then these installation steps will fail.
Programmer Instructions for the Xcode User
In the Apple Developer Web Portal
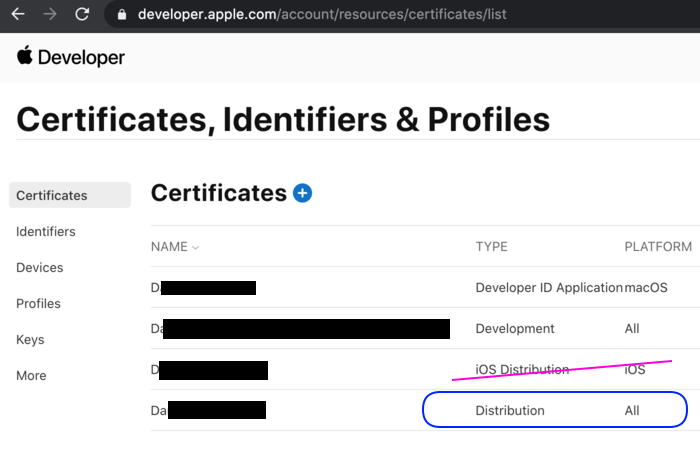
The Certificate
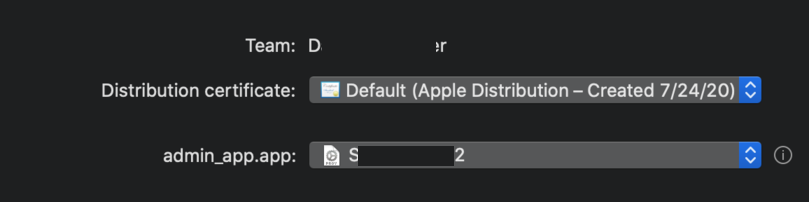
Create a Distribution Certificate. For Xcode 11, you must choose “Distribution” and not “iOS Distribution”, as shown below:
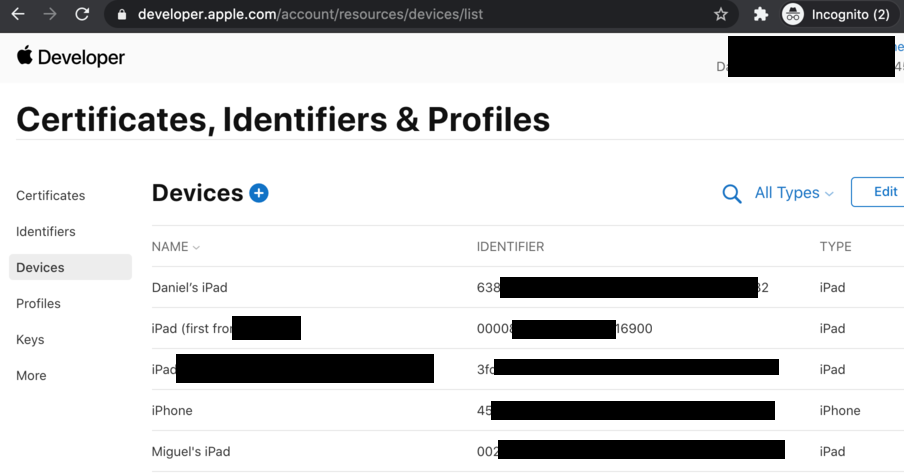
The Devices
Obtain the UDID of every iOS device that will need to run your app. Add all these device UDID(s) to your Apple Developer account, as shown. If you have previously connected any of the devices to your instance of Xcode, then you might discover that Xcode already “phoned home” to the Apple Developer cloud, and you might already have entries for those devices. You can edit them to assign more meaningful names to them.
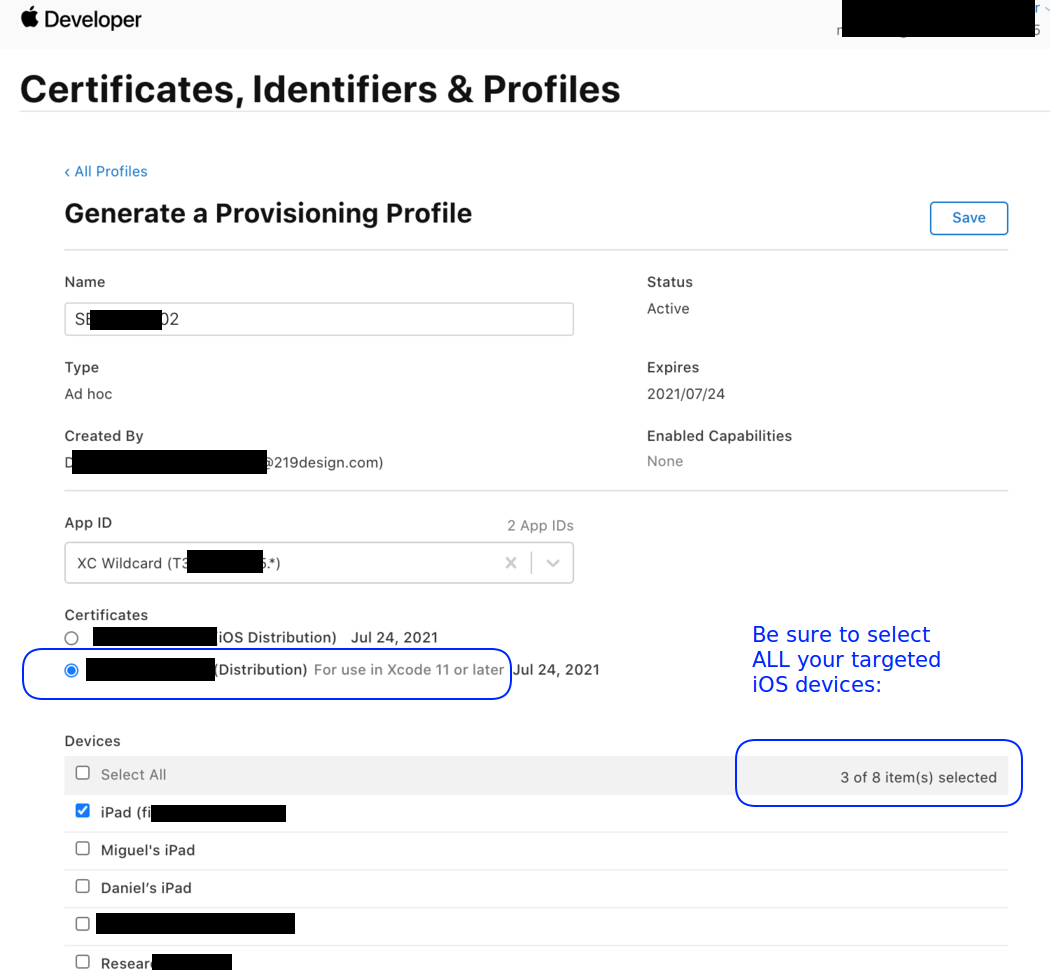
The Provisioning Profile
Create a Provisioning Profile that includes the Certificate from above and the UDID(s) from above. Refer to this screenshot for other details:
In Xcode
As long as your instance of Xcode is linked to the same Apple Developer account that can access the certificates and profiles described in the previous section, then Xcode should seamlessly cooperate.
It might be necessary to manually download the Distribution Certificate and add it to your local Keychain.
If you are trying to apply these steps to a project.pbxproj of an app that has never before been ad-hoc distributed, then you may run into Xcode errors that prompt you to make changes to your project.pbxproj file. For example, we were unable to ad-hoc distribute until we added this to the project.pbxproj:
ENABLE_BITCODE = NO;
Such changes to the project.pbxproj should be a one-time occurrence and should not need repeating for subsequent releases of your app.
Now, make sure you can compile the app in Xcode.
Then choose the menu option in Xcode labeled “Archive” (it should be located near the menu options for Build, Test, Clean, etc).
When “Archive” succeeds, it should open the Xcode window known as “Organizer” (even though in Xcode 11 the window does not seem to say the word Organizer anywhere).
In the Organizer window, select the archive you just created, and click “Distribute app”.
For “method” of distribution, choose: “Ad Hoc”
Enable “include manifest for over-the-air installation.”

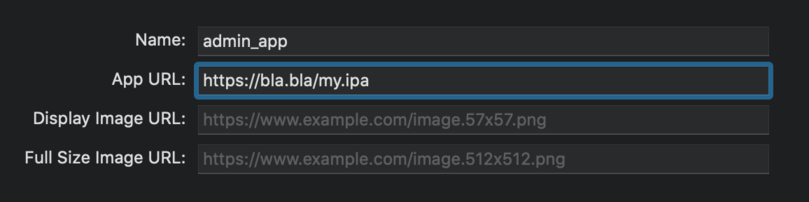
When prompted for the App URL and Image URL(s), just provide a bogus https url for now (we will edit the generated plist later).
Choose to Manually manage signing so you can be sure the distributed app will be signed with the Provisioning Profile you created earlier. This is particularly important for this distribution approach, because our Provisioning Profile contains the UDID(s) of MULTIPLE devices. If you let Xcode do something “automatic”, then you risk only provisioning for whichever single iPad or iPhone you might happen to have connected to your MacBook at this moment.
In Dropbox
The goal is to have 4 files available on the web using https (that “s” in “https” is crucial for this to work). Furthermore, each URL of each of these files must NOT result in a redirect! That is the reason for our current preference for Dropbox over Google Drive. We could not find a way to get a deep link to a file hosted on Google Drive that did not bounce through a redirect before delivering the raw file.
If Dropbox becomes infeasible or undesirable, you can host the 4 files yourself at any publicly-reachable URL(s) of your choice, as long as:
- HTTPS is used.
- The URL returns the raw file immediately (with HTML 200 code, not 301 or any 3xx).
The four files that must be uploaded are:
- The ipa file (iOS App Zip archive) produced by Xcode.
- A PNG icon size 57×57
- A PNG icon size 1024×1024
- A plist file (which will contain links to the prior 3 files), as described below.
Upload the ipa and two PNG files first. Enable link-sharing of these files in Dropbox and retrieve the links that Dropbox creates for you.
You cannot use the Dropbox links “as is”.
You must change them…
- from this: https://www.dropbox.com/s/xbl0jwo94xyzah/myicon57.png?dl=0
- to this: https://dl.dropboxusercontent.com/s/xbl0jwo94xyzah/myicon57.png
The former style of link would result in a 3xx redirect. The latter style results in 200, which is required in order for Safari to honor this whole scheme. (We know of no official documentation that clarifies this requirement. We determined this via trial and error.)
Once your IPA and PNG(s) are uploaded and the non-redirecting HTTPS URL(s) for them have been established, the final step is to compose the proper plist file and make that available via HTTPS, too.
Side-by-side in the folder where Xcode placed your IPA file, Xcode will have also created a file named “manifest.plist”
Earlier in this tutorial we showed a screenshot and instructed you to enter bogus strings for App URL and Image URL(s). Those bogus URL(s) are now inside the “manifest.plist” file.
Make a copy of the plist, and rename your copy to something that would indicate the date or version of your current app deployment. Open the plist in a text editor and note that it contains 3 URL(s), pointing to an IPA and 2 PNG locations. Replace the bogus URL strings with the dropbox links you obtained after uploading the IPA and images to their official dropbox locations. Save your changes to this edited plist.
Finally…
- Upload the plist;
- Establish the non-redirect (proper dl.dropboxusercontent.com style) URL for the plist;
- Prepend “itms-services://?action=download-manifest&url=” to the https URL;
- Direct your end-user to open that itms-services link in Safari.
Conclusion
This distribution method has saved us time on several projects by allowing us to deploy an iOS device without the Apple App Store and bypass a number of steps in the normal approval checklist. Our users have also appreciated receiving their development copy of the app without needing to download TestFlight.
It’s always our goal to save time and remove unnecessary friction from all stages of the development process.
If these tips saved you time as well, then we’re doubly happy to have multiplied the effectiveness of ad-hoc deployment across many teams.
References/Tutorials
- https://dev.to/gualtierofr/ad-hoc-distribution-for-ios-1524
- https://stackoverflow.com/questions/26042508/over-the-air-ota-ios-ipa-file-distribution-for-public
- https://www.impigertech.com/resources/blogs/ios-ota-app-distribution-guide
- https://muaca.blogspot.com/2019/10/how-to-do-over-air-ota-distribution.html